

By James Moffitt
Photos by James Moffitt
Until this year, I’ve paid to have all of my Euro mounts done. But, in an effort to become even more involved in my harvest, I decided to try my hand at a DIY European mount. Below is a step-by-step breakdown of how I got my new mounts out of the field and onto my wall. There are dozens of different methods for making a Euro mount—the method I describe below is what I found to work for me.
For the purposes of this tutorial, I’m operating off the assumption that your deer head has been separated from the rest of the body. I highly recommend wearing gloves when handling the deer head and any brain matter, saliva, or other fluids.
There are four primary methods for removing the flesh, fur, and everything else from the deer head. Many taxidermists use beetles. While this method interested me, I didn’t want to go through the hassle of ordering the beetles and disposing of them after they’d done their job.
Next is boiling—it is possible to submerge the head in simmering water for a length of time and then cut and pull off tissue and muscle. To be honest, this method seemed gross to me and I’d heard the smell was awful, so I decided to pass.
The third method is power-washing and cutting. You start by making incisions to remove large bodies of tissue and follow up by blasting the skull with a power washer. After some research, I learned that it’s pretty easy to damage the skull doing this, as well as being fairly messy with brain and tissue fragments flying around.
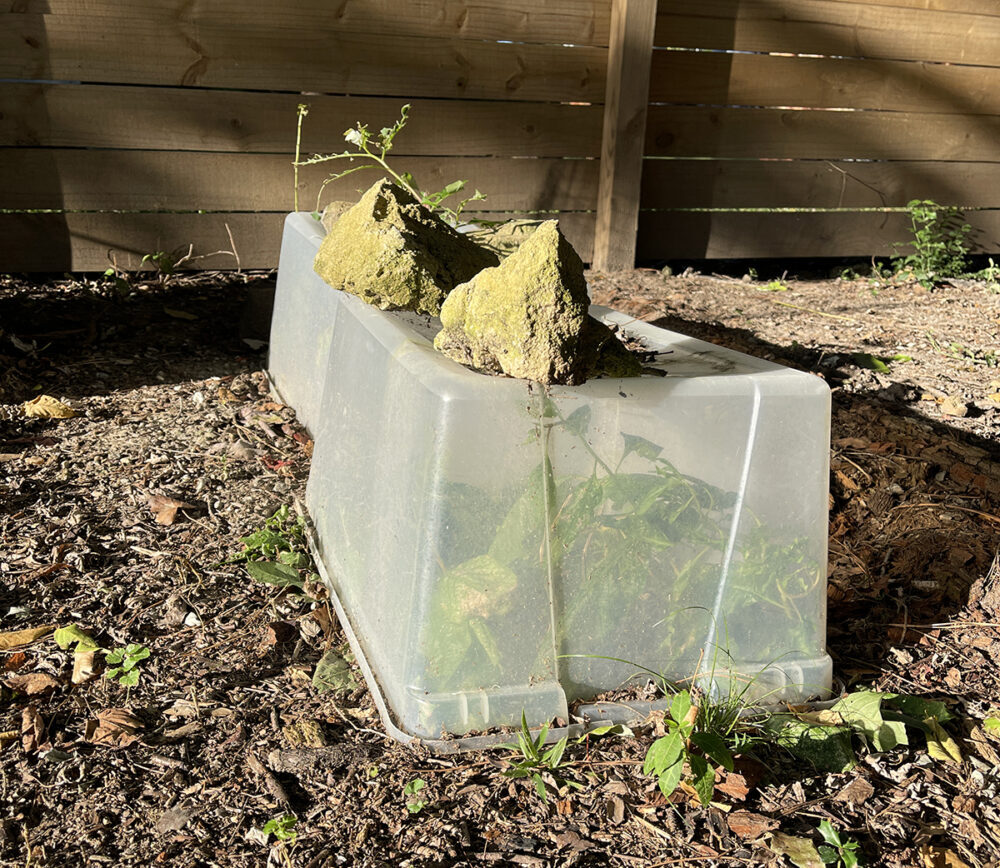
This brings us to the method I choose for cleaning my deer skull, burying. At the end of the hunting season, around early January, I buried my deer heads. To do this, I dug a square 18-inch-deep hole, big enough to fit all of the heads I was cleaning for myself and a hunting buddy. Then, I put all the heads in and covered them with the dirt. After that, I used some old storage totes to cover the mound, placed large rocks on top, and then drilled some holes into the totes for air flow.
I added the rocks to prevent wildlife (and my dog) from following their nose and digging up the heads. The ventilation holes kept condensation from building up as the temperature changed and allowed flies and other insects a chance at the heads.
After patiently waiting all spring and summer, I dug the heads up in the last week of September. Overall, I was thrilled with my results. The skulls were completely clean. However, I did make a mistake in not preserving the nasal bones better. Apparently, they can break off and get eaten up pretty quickly, and as a result all of my deer skulls have missing, cracked or destroyed nasal areas. I’m personally not concerned about it for this group of skulls but if you want to have a perfectly intact mount, you need to consider burying them for a shorter period of time. Some hunters also recommend zip-tying the nose pieces in place.
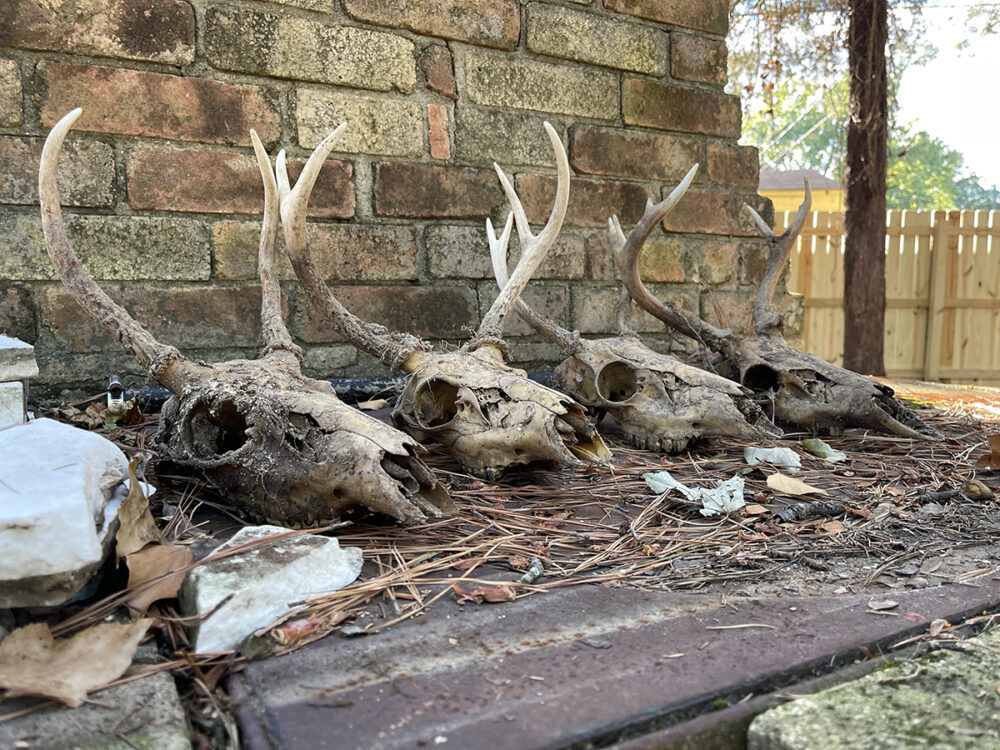
At this point, the skulls are ready for the final step, bleaching. This is an aesthetic choice. The skulls will come out of the ground stained with minerals from the earth. If you like this rustic, earth brown look, you can leave it. Simply give the skull a detailed scrub with warm soapy water and you’re done.
If you’re after the pure white of a traditional Euro mount, you’ll need to spend time “bleaching” the skull to get it to the right color. As I learned through my research, step one of bleaching a deer skull is to never use bleach. Instead, most people recommend heating a large pot outdoors with Oxiclean and then submerging the skull. Make sure to leave a few inches of water on top for the cleaner to do its job and pull the dirt and grime upward off the skull.
Oxiclean uses an enzymatic process to clean, which means it starts working instantly. Once the skull is submerged, remove the pot from heat and let it sit. It’s important here to watch your skull, as the enzymes can damage and soften the bones if left too long. You’ll see your skull whitening. Once it has reached a whiteness level you like, remove it from the water and let it air dry.
That’s it! You should now have a clean and ready-to-display Euro mount. Like any other DIY process, there can be some trial and error with this method. I found that really taking my time and asking lots of questions on hunting forums helped me get the information I needed to help my project turn out the way I wanted.
James Moffitt is the founder of TrailHead Creative, a branding, and content agency based in Richmond. He’s an avid outdoorsman, hunter, and angler and takes any opportunity he can to spend time outdoors with his wife and Labrador retriever, Huxley.
