
Limited in number for centuries by vast, unbroken forest, the fortunes of quail turned dramatically in response to an abundance of food and cover supplied throughout a period when a horse-drawn, small-farm economy dominated Virginia’s landscape. With axe, fire and plow, settlers coming to Virginia, and their descendants for several generations to follow, cut old growth, created clearings and exposed the soil. No better prescription for improving conditions for quail could have been written. New, fallow and old fields were interspersed like checkerboard squares. And always close by was the bobwhite, sounding reveille at morning’s first light, making its way along a weedy corn field edge, brood in tow, and interrupting the farmer’s winter chores with its explosive flight. Quail habitat of the period was superb and the birds numerous.
While the return of “the good ol’ days” of bobwhite abundance is not on the horizon, farming techniques of the period well illustrated the methods that will provide the quail’s needs. The manner and means of yesterday’s land use are, today, the tools of successful quail management.
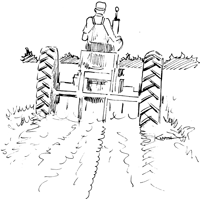
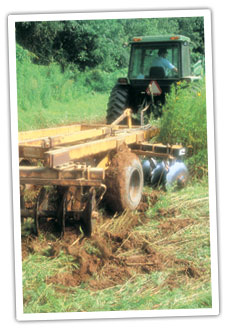
Discing
Discing, including plowing or any other mechanical means of disturbing existing vegetation and exposing soil is probably the most valuable technique used in quail management. Discing is particularly useful for establishing food strips, creating field borders, installing fire lines, or simply setting back older vegetation and renewing succession. Discing can be employed on larger areas where burning (to be discussed) may not be feasible or give the desired results. Discing means turning under all existing vegetation. Where a thick sod has formed, a heavy offset disc or moldboard plow may be required. Landowners with only a light disc and small tractor may have to hire someone to work the ground initially. Once the sod has been broken, further work can be done with lighter equipment. Dense vegetation also can be made easier to disc by first rotary mowing (bush hogging) or burning.
In some instances, light discing may be called for to merely thin the vegetation and expose just enough bare soil to create plant diversity. Light discing is usually enough to encourage self-seeding of many desirable annual species, including annual lespedezas, partridge pea and ragweed.
Large fields should be divided or “broken up” by strip discing to increase edge and diversity. Strips should be 20-30 feet wide and placed at intervals of several hundred feet.
Each year, disc approximately one-third of the total area managed by this practice. This is frequent enough to maintain sufficient bare ground. On slopes, discing should follow the contour. Also take precautions when discing undesirable plants like johnsongrass, Bermuda (wire) grass, thistle or cocklebur. Discing may encourage these or cause their spread. Applying herbicide to undesirable species before doing any soil disturbance can reduce problems later. Also, the release or spread of these is less likely to occur if the area is burned rather than disced.
Prescribed burning
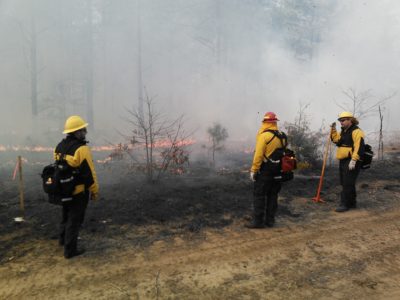
Patrolling the fire line in proper protective gear on an understory burn.
Prescribed burning is the controlled use of fire to:
- set back existing vegetation
- remove litter
- control woody plants
- release more desirable plant species
The use of fire is an extremely effective and economical technique for managing most elements of quail habitat. The time required to burn is typically less than that required for discing, and fire produces many of the same benefits. As with discing, normally one-third of the total area managed with fire should be burned each year. A three-year rotation will usually meet the objectives; however, the frequency of burning is ultimately determined by the conditions on site. Fields dominated by grasses usually need to be burned more frequently than those dominated by annual forbs.
If inexperienced with burning, Virginia’s Department of Wildlife Resources (VDWR) and Department of Forestry (VDOF) periodically offer burn workshops to instruct landowners in the value and application of fire. Additionally, the Department of Forestry offers a “Prescribed Burn Manager Certification Program.” There are also contractors that do prescribed burning. A list of contractors is available from VDOF and on our quail website.
Establishing safe fire breaks, or fire lines, is the first priority when planning to burn. Streams or roads can serve this purpose if they are wide enough to contain the fire. Otherwise, fire lines, usually constructed by discing, must be installed. Lines should be at least ten feet wide and void of any flammable material. A satisfactory fire break must completely surround the area to be burned. Install interior fire lines around structures, including telephone or electric poles, and unique cover types. Disc interior lines to divide large areas into smaller increments of about five acres. These smaller areas can be rotationally burned from year to year. Also, fire is more manageable in smaller increments, thus providing an added measure of safety when conducting the burn. Smaller areas also give the opportunity to stop burning if weather conditions change.
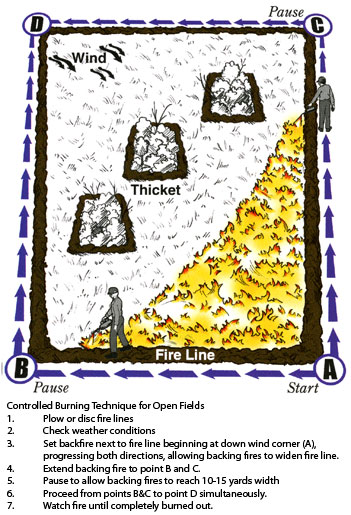
Construct fire lines in the fall. Burning should normally be done in late-winter (mid-Feb. thru mid-Mar.). This, however, is usually the worst possible time to install fire lines. Having fire breaks in place well ahead of time vastly increases the chances that burning will get done. Lines should be left smooth enough to seed. Broadcast or drill a winter small grain – wheat, barley or winter rye. Seeded fire lines reduce soil erosion over winter, create safe, “green” lines for containing the burn, and provide excellent brood cover the following summer. If such planting is intended, a late-summer application of herbicide before discing is recommended if there is tall fescue or Bermuda grass present.
Burning should be conducted under effective but safe conditions. Soil moisture and relative humidity should be such that the fire burns cleanly, but not so dry that there is great danger of surrounding areas being kindled by hot, flying debris. Consider the wind direction and amount of smoke produced when burning near highways or neighbors. And let the neighbors know before burning. If possible, burn on “bluebird days,” days when the barometric pressure is high and there is a five to ten miles an hour wind from a steady direction. With these conditions, smoke will rise and dissipate quickly. Use a backfire(burning against the wind) when beginning a burn to observe the fire’s behavior, and to slowly create a “black” line between the fire and the firebreak. This will increase the margin of safety if the wind increases. Backing or flanking fires (burning perpendicular to the wind) are usually more effective for removing ground litter and killing woody vegetation. Head fires (burning with the wind) tend to move too quickly for the best results. With little wind, a head fire may sometimes be necessary to keep the fire moving.
To reduce the chances of erosion, fire can be used on slopes where discing should be avoided. When burning on slopes, be aware that fire will respond much as it does to wind, burning more rapidly up slope than down. When burning hillsides, if other conditions permit, begin the fire at the top, backing it downward. Fire lines should be placed on, or slightly beyond the crest of the slope being burned.
When burning, it is often desirable to leave a few small patches of unburned vegetation within the burned area. Depending on the type of vegetation being burned and burning conditions, patchy burns often result with no special effort. These mosaic burns are beneficial when large areas are being burned and it is desirable to retain some of the old vegetation for cover until new growth appears.
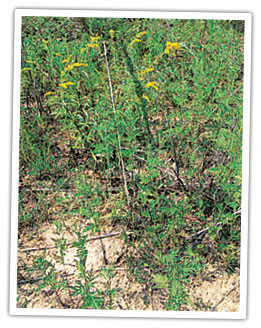
A word of caution: When the objective is to produce old field conditions, do not burn so frequently that all woody vegetation is eliminated. The attractiveness of areas containing a woody component is apparent from the frequency in which quail are found in these.
Prior to burning, have sufficient help and necessary tools on-site. Consider the needs for conducting the burn as well as those to suppress any breakouts, should they occur. Be aware of any fire laws that might be in effect, and always notify the local fire department (usually through the Sheriff’s Office) and the Virginia Department of Forestry before beginning a burn.
Seeding Practices
With respect to quail, most seedings need not, and should not, be at the same rates recommended for agriculture. In most instances, rates recommended for agricultural production can be reduced by one half for quail plantings. Beware of the tendency to believe more is better. Seedings should result in growth thick enough to suppress competition but not too thick for quail to easily move through. Additionally, excessive seeding causes competition between individual plants and lowers the yield. Grain sorghum is a prime example. Also, reduce individual seeding rates according to the number of species being seeded when planting mixtures. Consult a private lands wildlife biologist for more specific recommendations.
Seedbed preparation should be as thorough as possible. At a minimum, work the soil to a depth of three or four inches and leave no more than a trace of old vegetation. Seed can be broadcast by hand, or with a hand-cranked or tractor mounted seeder. Seed also can be drilled, a better method than broadcasting if a drill is available. Most varieties of seed should be only lightly covered (one-half to one inch). If broadcast, a disc set straight or at a slight angle works well for covering most seed. A wooden drag or heavy chain can also be used. Native annual and perennial lespedezas like slender, roundhead and trailing, or native beggarweeds, can be seeded without being covered if there is sufficient exposed soil for the seed to contact. Fertilizer is usually optional unless the soil is extremely poor. Fertilizer may help the species seeded but also helps the competition, and may cause too much growth of undesirable volunteer species in subsequent years, diminishing the site’s long-term value.
Before planting legumes, the seed should be inoculated. Inoculant is a fine powder containing bacteria that helps these plants gather nitrogen and improve their growth. Suitable bacteria may already be present in the soil, but inoculation before planting will insure their presence. Make sure the inoculant is the proper one for the species being seeded. Mix the seed and inoculant thoroughly before planting. Some legumes also require a “sweeter” soil of at least pH6, so lime is usually required for clovers. Conducting a soil test is advised to be sure.
Native warm season grasses
Exercise the greatest care when seeding native warm season grasses (NWSGs). A clean, smooth, firm seedbed is required if conventional tillage is used. A cultipacker should be used to smooth and firm the soil before planting. Cultipack again after broadcasting to press the seed into the soil. This will sufficiently cover the seed to the desired depth, about one-quarter inch.
In most instances, NWSG should be seeded with a drill. This can be done by tilling and cultipacking first, or by the no-till method. Switchgrass can be seeded with a conventional grain drill and gammagrass with a corn planter. Other NWSGs, such as indiangrass and big bluestem, require planting with a specialized NWSG drill. These specialty no-till drills are available from certain Soil and Water Conservation District offices and some private wildlife contractors. Do not use any.
Recommended NWSG seeding rates for grazing and for wildlife plantings are shown in Table 1.
| Table 1. Warm Season Grass Planting Rates for Grazing or Wildlife | |||||
|---|---|---|---|---|---|
| For grazing | For wildlife | ||||
| Species | Drilled | Broadcast | |||
| (Pounds Pure Live Seed [PLS] per acre) | |||||
| Switchgrass | 3-4 | 4-5 | 3 | ||
| Big Bluestem | 6 | 8 | 3-4 | ||
| Indiangrass | 6 | 8 | 3-4 | ||
| Coastal Panicgrass | 5 | ||||
| Eastern Gamagrass | 8 | * | 7 | ||
| * Do not broadcast | |||||
More detailed information about establishing NWSGs, and their value to quail and use in livestock production, is given in the University of Tennessee Center for Native Grasslands Management’s publication “Establishing and Managing Native Warm Season Grasses in the Mid-South: A Landowner’s Guide” available through this website or through University of Tennessee, Knoxville.
Creating Edge
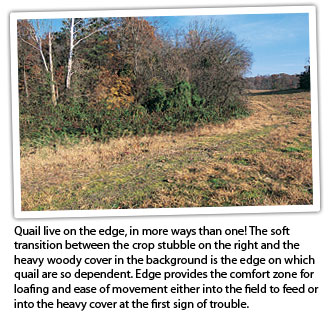
Quail are often referred to as “edge species,” frequently being found where several of their particular needs are served side by side. At least one side is usually vegetation that will provide quick concealment if there is need to escape. It is not by chance that quail are so frequently found along fence rows, tree lines, or drainages. The absence of satisfactory and sufficient edge, alone, can render an area unsuitable for bobwhites.
Fortunately, nearly every management activity performed-discing, burning, food strips, field borders and similar actions-produces edge. The amount of edge created will depend on the extent and configuration of the activity. The greatest amount of edge per acre is derived from long, narrow configurations. For example, a square acre (209′ x 209′) has 836 feet of edge. In contrast, a long, narrow rectangular acre, 20 feet wide and 2,187 feet long, has 4,392 feet of edge-over three-quarters of a mile! Clearly, practices of greatest benefit to quail are those arranged in strip, rectangular or oblong shapes. Practices established in a meandering fashion can also increase edge. A winding food strip or hedgerow, or those that follow the contour of a hillside provide more edge than those established in a straight line.
A nice border of weeds and wildflowers between crop field and woodland.
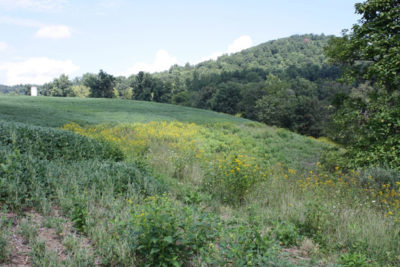
Field Borders
Often synonymous with edge are field borders. Few practices are easier to implement or come closer to meeting the quail’s needs. With field borders, edge, diversity and interspersion, all come together like the main ingredients of a three-bean salad. Even fallow and old fields should be given a border of some kind. A freshly disced strip along their perimeter will diversify the plant composition. With any type of border, it should be located where it will receive as much sun as possible. In fields surrounded by trees, the north side of the field is the best location.
Natural borders
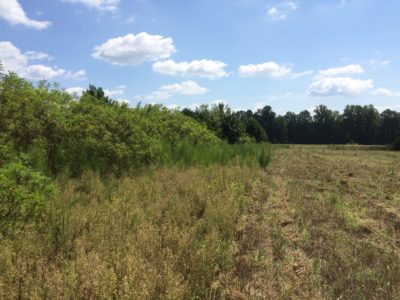
This cutback border creates a nice transition between mature woodlands and a meadow.
Simply leaving an undisturbed area at least 30 feet wide along field edges can create a valuable border. This will result in a natural, fallow border if the field was cultivated within the past year or two. Discing or an application of herbicide is necessary if the area idled for a border is in dense sod. Otherwise the diverse plant community that is desired will not emerge. Natural borders can be allowed to grow into the old field or brushy stage, or maintained fallow by occasional discing.
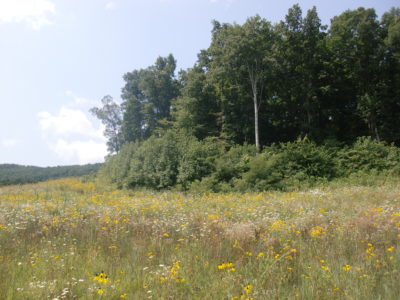
Cutback borders
Frequently the edges of crop fields become invaded by undesirable trees that grow to a size of no value to quail and shade out plants of benefit. Also, roots and branches of large trees that extend into a crop field sharply reduce production along its edges. In these situations, cutting, or otherwise removing most trees will provide several benefits. First, by allowing sunlight to reach the ground, vegetation more beneficial to quail will quickly emerge. Second, crop yields near the field edge will improve. And perhaps most appealing, cropland acreage will not be reduced.
As the term implies, cutback borders are usually created by felling the trees with a chainsaw. Other methods include, killing selected trees with a basal application of herbicide or using a bulldozer or other means to push the trees away from the field edge. When sawed, hardwoods will quickly sprout at the stump and form a brush border in one or two growing seasons. Some trees can be hinge-cut, felled 2′ to 3′ above ground while leaving the tree partially attached to the stump. These produce a living brush pile that will remain for years. Cedars are particularly suited to this practice. Cutback borders should be at least 30 feet deep and extend along as much of the field edge as feasible. Cut back a portion of a field’s edge each year to provide various stages of regrowth. When cutting, occasionally leave trees or shrubs of special benefit. Dogwood and wild plum are examples.
Planted borders
Two types of planted borders are herbaceous and shrub. An excellent border is created when these are combined, paralleling each other with the herbaceous planting closer to the opening. Using both a herbaceous and shrub planting next to a tree line creates a stair-step effect, providing a “soft” edge between field and forest. Where native shrubs or small trees are already present, adding a herbaceous component is enough. A planted herbaceous border can be grasses, forbs or a mixture of the two. The selection of plant species should be based on overall need-supplemental food, nesting cover, bugging area or escape cover.
Shrub borders are usually established using seedlings. Plant seedlings in firm soil. Unworked soil is fine if aggressive plants are not present. If the soil has been recently worked, allow it to settle before planting seedlings. Many native shrubs be can used such as wild plum, indigo bush, viburnums, and more. Consult your private lands wildlife biologist for details.
Hedgerows
Hedgerows can be established in much the same fashion as field borders. Typically, hedgerows are used in large fields to provide escape cover, but can be customized to meet other needs. Hedgerows can be established by simply allowing a strip within a field to grow into whatever it will. Disc and/or herbicide any dense sod to encourage a diversity of new plants.
Shrub hedgerows and field borders can be enhanced by allowing herbaceous vegetation to grow up 30’ or so adjacent to them. This indigo bush hedgerow is bordered by a diverse stand of native plants.
Specific plantings may be a more reliable and faster means of hedgerow establishment-and perhaps, aesthetically, more pleasing. Hedgerows can be planted with trees and/or shrubs. Hedgerows can be made even more attractive by creating a herbaceous strip on one or both sides. Plant a bunch grass/legume mixture to encourage nesting, an annual food mixture, or simply disc a strip and leave it fallow for brood rearing cover. The choice will depend upon which habitat type is most needed. The total width of a hedgerow should be at least 30 feet.
Herbicide use
Though the use of any pesticide is often questioned, particularly with regard to wildlife, many modern herbicides are virtually nontoxic. They are not only safe to use when applied according to their label, but can be a valuable tool for improving quail habitat. They must be used judiciously and not overused. Using more is not always better. Follow the label “The Label is the law.”
When an undesirable plant (as in undesirable to quail habitat) is present, an herbicide application should be considered in virtually every instance before disturbing the soil or making any plantings. Typically, herbicides are applied soon after the onset of new growth of the plant to be killed. Where there is an accumulation of old growth, remove this by burning, haying or grazing before applying the chemical. This will fully expose the new growth to the herbicide and give the best results. Glyphosate has been the herbicide of choice for many years. It kills a broad range of plants effectively and is, otherwise, environmentally quite safe. Glyphosate must be applied during the plant’s growing period. Another chemical, imazapic, is also a safe, broad-spectrum herbicide and has a 40-45 day residual effect. Additionally, imazapic works effectively on plants during their dormant period. Because it is selective (not killing all species), this product has some unique uses, including control of competition during the establishment of certain warm season grasses.
Consult a private lands wildlife biologist, or a Cooperative Extension Agent for specifics on herbicide use.
Fescue Control or Eradication
The widespread use and unintended spread of tall fescue has rendered vast acreage across Virginia unfit for bobwhites. Fescue’s dense and often-matted form of growth provides virtually no value as cover. Neither does it provide food. On lands being managed for quail, the aggressive control or eradication of fescue should be a top priority. Controlling or removing fescue and other similarly aggressive grasses allows more desirable plants to emerge and flourish. Some fescue can be tolerated if the ground is to be worked periodically, such as for an annual food strip. However, fescue should be eliminated before making any permanent plantings. With only limited means to control this grass after a more desirable planting is made, fescue will likely soon destroy, or make useless any new planting.
Burned fescue will also re-emerge; although it has been reported that repeated burning of fescue will weaken and eventually eradicate the plant. At the very least, burning the accumulation of a year or more of fescue growth provides some temporary improvement. But don’t underestimate this plant’s ability to come back.
The most frequently used long-term solution for suppressing fescue is to first; burn, heavily graze or mow the plant, and then apply a suitable herbicide to the regrowth. When using glyphosate, the fescue should be actively growing (spring or fall) and 6-10 inches tall at the time of application. Adding 4 oz., per acre, of imazapic will offer sustained control.
Moldboard plowing is another option for fescue control. After plowing, a “smother crop” should be planted to shade and compete with any residual fescue. The choice for a smother crop should be a hardy, fast-growing, leafy annual. Soybeans, cowpeas or grain sorghum will work well. Here, use agricultural seeding rates. Eradication of fescue may require repeat treatments or a combination of practices. The most aggressive and effective means of fescue control combines burning or mowing, applying a herbicide, plowing and planting a dense smother crop.
Mowing
Except indirectly, mowing (including rotary mowing or bush hogging) potential quail habitat has virtually no value and is usually a detriment. Mowing reduces cover and food producing plants to stubble, encourages the formation or increases the density of a grass sod, and leaves behind an added layer of litter. Particularly damaging is summer mowing which has destroyed many nests over the years and fall mowing which eliminates cover and food that might be utilized by quail throughout the critical winter period. Indirectly, mowing can be beneficial if done to gain better results from a herbicide application or clearing dense growth before discing. Mowing can also be used to prepare areas for burning that are heavily infested with small woody plants. These areas may not have enough fuel on the ground to carry a fire. Rotary mowing followed by a year’s growth of herbaceous plants should provide enough fuel for a successful burn.
If there is no other choice but to mow, do so early in the year (Feb. 15 to Apr. 15), prior to the emergence of new growth. With this timing, new vegetation will soon replace the old and can remain standing throughout the rest of the year. Alternate year spring mowing is frequent enough to keep woody plants in check. Even better, if woody growth is slow, mow only a half or third of the area each year on rotation. Best of all, reconsider mowing and use fire or a disc.
Fallow Fielding
Another option very similar to disk plots is fallow fielding. Fallow fielding is an excellent way to incorporate dove fields into your quail management activities. Fallow field areas should be about the same size as disk plots. Again, divide the area into thirds and work one third of the area each year. Rather than lightly disking these areas, you will want to produce a firm seedbed for planting. Lime and fertilize the areas as recommended by a soil test (the local seed dealer or Virginia Cooperative extension office can perform the soil test). Planting options are numerous and listed below. The idea behind fallow fielding is to produce a high-quality planting during one year and allow that section to remain fallow for 2 years. This technique is attractive to a wide variety of wildlife species and offers the same benefits of disk plots with the added bonus of the attraction potential of high quality food source.
Fallow Field planting options:
- Small Grain (wheat, rye, etc…)
- Plant – mid-September to mid-October
- Soil Type – widely adapted, pH 6.0-6.5
- Broadcast – 120 lbs. per acre
- Drill – 80 lbs. per acre
- Season used by wildlife- fall, winter, spring
- Wheat/Crimson Clover/Austrian Winterpea
- Plant – mid-September to mid-October
- Soil Type – widely adapted, pH 6.5
- Broadcast – 50 lbs. wheat, 15 lbs. peas, 15 lbs. clover per acre
- Drill – 35 lbs. wheat, 8 lbs. peas, 8 lbs. of clover/ acre
- Season used – fall, winter, spring
- Buckwheat
- Plant – late spring, early summer
- Soil Type – widely adapted to most soils, fertile or infertile
- Drill – 30 lbs. per acre
- Broadcast – 50 to 60 lbs. per acre
- Season(s) most used by wildlife – summer, fall
- Millet (Browntop, Pearl, Dove Proso, Foxtail)
- Plant – late spring to mid-summer
- Soil Type – well drained soils, pH 6.0 – 6.5
- Drill – 15 lbs. per acre
- Broadcast – 25- 30 lbs. per acre
- Season(s) most used by wildlife – fall, winter
- Sorghum
- Plant – spring to early summer
- Soil Type – does not like acid soils, pH 6.0 – 6.5
- Drill – 5 lbs. per acre
- Broadcast – 15 lbs. per acre
- Season(s) most used by wildlife – summer, fall, winter
- Buckwheat/Millet/Sorghum
- Plant – spring to early summer
- Soil Type – widely adapted, pH 6.0 – 6.5
- Drill – 20 lbs. buckwheat, 8 lbs. millet, 2 lbs. sorghum/ acre
- Broadcast – 30 lbs. buckwheat, 12 lbs. millet, 5 lbs. sorghum/ acre
- Season(s) most used by wildlife – summer, fall, winter
- Sunflowers
- Plant – May through early June
- Soil Type – fertile, well drained, pH 6.0
- Drill – 25 lbs. per acre
- Broadcast – 40 lbs. per acre
- Season(s) most used by wildlife – late summer, fall, winter
The NBCI Comprehensive Guide to Bobwhite Quail Habitat Management »